
First hours in Aniimo
Stay on the opening until Command, Twining, and Nimbus Fields are unlocked. Then catch one Aniimo that covers a job Helion or Lunara does not do.

Follow the story until Nimbus Fields opens. Your first wild catch should add a job, not a second Holy attacker.
What to do in the first hours
The tutorial hands you one system at a time. Finish that sequence before you start clearing the map.
Create your Wayfarer, land the tutorial catch, then pick Helion or Lunara. After that the game asks you to Command an Aniimo and Twine with one. Keep following the objective through the Institute scenes; the function menu appears there, not in the cavern.
Once the transporter drops you in Nimbus Fields, the map opens up. Use the story marker as a spine and take short detours for a catch, a chest, or a material you already need. If a path asks for a field skill you have not seen yet, turn around and come back later.
- 01
Create the Wayfarer
This screen is about the explorer, not the team. Combat stats come from Aniimo you catch later.
- 02
Land the first catch
Read the percentage beside the target before you throw. That habit matters more than the tutorial Aniipod. See Catching.
- 03
- 04
Use Command, then Twine
Command keeps you on the field while an Aniimo attacks. Twining puts you in the creature’s kit and is also how you cross later terrain.
- 05
Finish Institute initiation
Membership, the first badge beat, and the function-menu prompt happen here. Then the transporter sends you into Idyll.
- 06

A first route in Nimbus Fields
A route you can actually run. A worked example of “What to do in the first hours”, not a new plan.
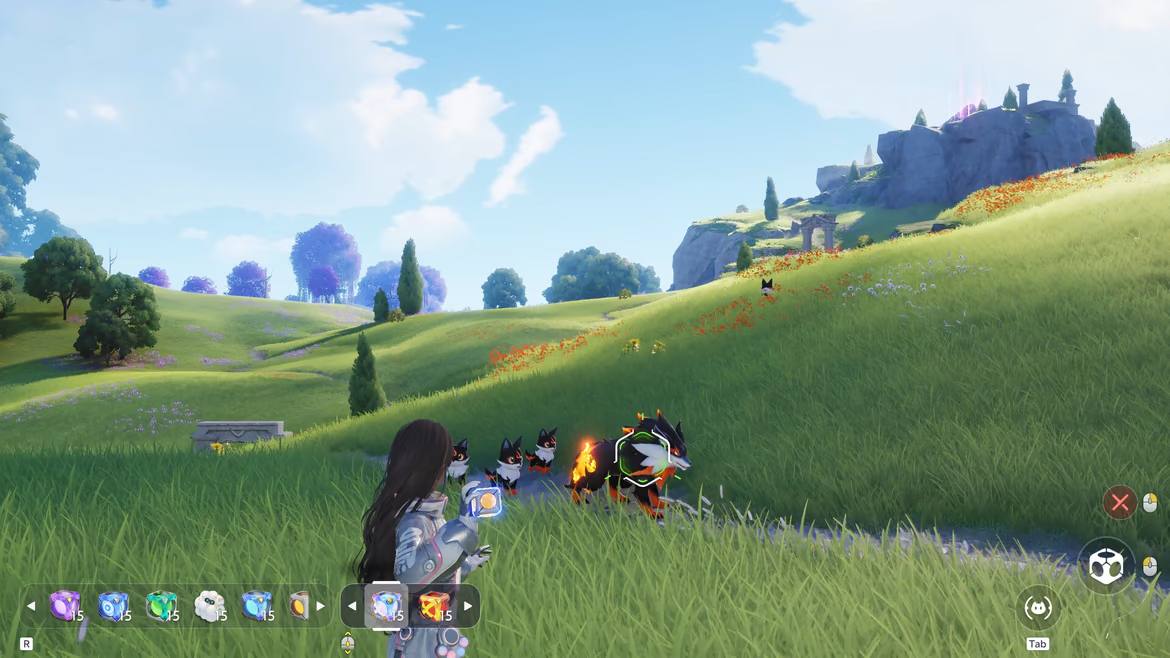
This is the first-hour route, not a new checklist. Start in Nimbus Fields with Emberpup as the familiar anchor, then look for one catch that changes the way the party works. Chirpi gives you a Wind support profile to inspect, while Skippy introduces Water and healing. You do not need both immediately.
Before leaving the area, make one short material pass rather than clearing every icon. The current Breezy Plains map records 36 Lunar Daisy, 16 Orange Cap, 16 Azur Grass, and 6 Turtleback Ore points in Nimbus Field. Pick one layer, follow it until the route is familiar, then turn it off.
Finish by repeating a piece of the route while Twined. Emberpup's Hustle consumes stamina to increase movement speed; Bolty's High Jump solves a different problem by creating vertical reach. If the second pass does not make travel easier, keep the new catch as a team candidate instead of forcing it into a traversal job.

| Stop | What to do | What the stop teaches |
|---|---|---|
| Emberpup profile | Read Fire, DPS, Fire Bolt, Hustle, and the listed habitats | How profile fields connect combat, movement, and location |
| Nimbus Fields | Compare Chirpi and Skippy before choosing one catch target | Why a new role matters more than another portrait |
| One material layer | Run Lunar Daisy, Orange Cap, Azur Grass, or Turtleback Ore—not all four | How to turn the map into a route instead of a wall of pins |
| Repeat while Twined | Compare Emberpup's speed with a movement tool such as Bolty's High Jump | Whether the field ability solves the terrain you are actually crossing |
Choose Helion or Lunara
The opening screen puts Helion and Lunara side by side. Both use Holy, so the choice is how the first fights feel, not which element you ‘should’ main.
Helion stays close. Light Bombardment costs 20 EP and hits for 62 power; Solar Grace adds 20% damage when the attack is not already super-effective, and every four basic attacks charge the next skill. Pick Helion if you like committing to one target.
Lunara fights at range and can recover during longer encounters. Its profile lists Moon Impact as a 15 EP magic hit, and Moon-Washed restores 20 EP. Lunara’s Ultimate temporarily becomes Fennelun; Helion’s matching Ultimate becomes Soleon. You are not picking Fennelun on the opening screen.
Your next catches should cover what the starter does not: another element, a Heal or BREAK job, or a field skill. Two Holy DPS records do not make a team. See Catching when the first wild target appears.
| Record | Element / role | What it is good at | What to catch next |
|---|---|---|---|
| Helion | Holy / DPS | Close-range burst; Light Bombardment 20 EP, 62 power | A ranged option, Heal, or a second element |
| Lunara → Fennelun | Holy / DPS | Ranged magic and EP recovery; Moon Impact 15 EP, Moon-Washed restores 20 EP | A close fighter, BREAK, or a different element |
Command and Twining
Command leaves the Wayfarer on the field and sends attack orders to an Aniimo. Twining puts you inside one creature: its skills, stamina, and movement become yours. The tutorial makes you use both before the wider map opens.
Outside combat, Twining is how you travel. Emberpup’s Hustle spends stamina to run faster. Bolty’s High Jump solves a different problem: vertical reach. If a chest or gap looks placed on purpose, stop jumping as the Wayfarer and check the mobility records.
You do not have to build the whole party around the Aniimo you like to Twine with. One record can be the travel tool; another can be the fight you actually enjoy.
Build a three-job team
Early on, three different jobs are enough: someone who deals damage, someone who recovers, and one slot still on trial. Emberpup (Fire DPS), Skippy (Water Heal), and Leafy (Grass energy support) are a readable set, not a ranking.
After a slow or lost fight, name the failure. Resisted element, no BREAK pressure, no heal, or a route that felt awkward each point to a different search. Change one slot and run the same activity again. Combat covers the fight; Team Builder is where you test the swap.
Put the Aniimo you already like into Team Builder first. Add candidates only to test the missing job. If a lineup looks complete on paper but you do not want to take it out, keep looking.
| What happened | Look for | Where to start |
|---|---|---|
| The fight took too long | A better element or a clearer DPS skill | Type chart and creature profiles |
| The target never opened | A BREAK role or a high BREAK skill | Skills and Team Builder |
| You kept backing off | Heal, Regen, or a safer range | Skippy, Leafy, or another support record |
| The route felt awkward | A mobility ability that matches the terrain | Mobility records and the map |
Emberpup, Skippy, and Leafy
Three early jobs. A worked example of “Build a three-job team”, not a new plan.
Use these three records as a readable test, not a recommended party. Keep Emberpup as the direct attacker, add Skippy when you want a recovery button, and study Leafy when energy support becomes the issue. Fire Bolt costs 10 EP and applies Fire Debuff; Healing Water costs 20 EP and heals the party; Blooms of Vigor creates a field that restores EP to Grass teammates.
Take that trio into an ordinary encounter and watch what you actually press. If Healing Water sits unused, sustain may not be the missing job yet. If you constantly wait for EP, Leafy's field becomes worth testing. If Emberpup handles the encounter but the route feels slow, the next catch should probably solve movement rather than replace your attacker.
This is the habit worth carrying beyond the tutorial: change one job, replay one familiar situation, and keep the change only if you can feel the difference. Team Builder can show roles and elements, but the field tells you whether the plan belongs to the way you play.

| Aniimo | Visible job | Concrete record | Question to test |
|---|---|---|---|
| Emberpup | Fire DPS | Fire Bolt: 10 EP, 30 Power, 1s cooldown, 100% recorded BREAK | Can the anchor handle ordinary pressure reliably? |
| Skippy | Water healing | Healing Water: 20 EP, 20s cooldown, party heal based on caster max HP | Do you use recovery often enough to reserve a slot for it? |
| Leafy | Grass/Water energy support | Blooms of Vigor: 10 EP, 20s cooldown, restores EP to Grass teammates in its field | Does your actual rotation benefit from the field condition? |
Quick answers
What should I do first in Aniimo?
Follow the opening through character creation, the first catch, the Helion or Lunara choice, Command and Twining, and Institute initiation. Start taking map detours after you reach Nimbus Fields.
Should I pick Helion or Lunara?
Pick Helion for close-range burst or Lunara for ranged fights with recovery. Both are Holy, so your first wild catches should add other elements and jobs.
When does the function menu unlock?
After the cavern, join the Polaris Institute and continue through the membership and first-badge scenes. The HUD prompts you to open the function menu before the transporter to Idyll.
Who should I catch after the starter?
Catch for a job you do not have. In Nimbus Fields, Emberpup is a Fire attacker, Chirpi is Wind support, and Skippy is Water healing. You do not need all three on day one.